

How to enter, follow, and exit the options trades in our alerts.
Start With the Trade Card
Our trade alerts are designed to separate four things that are easy to blur together: the idea behind a trade, the exact order, whether that order filled, and how we plan to manage the position afterward.
The trade card gives you the order at a glance. The paragraphs below it explain why we like the setup and why we chose that structure. The status line tells you whether we actually entered it. The exit section explains what we plan to do next.
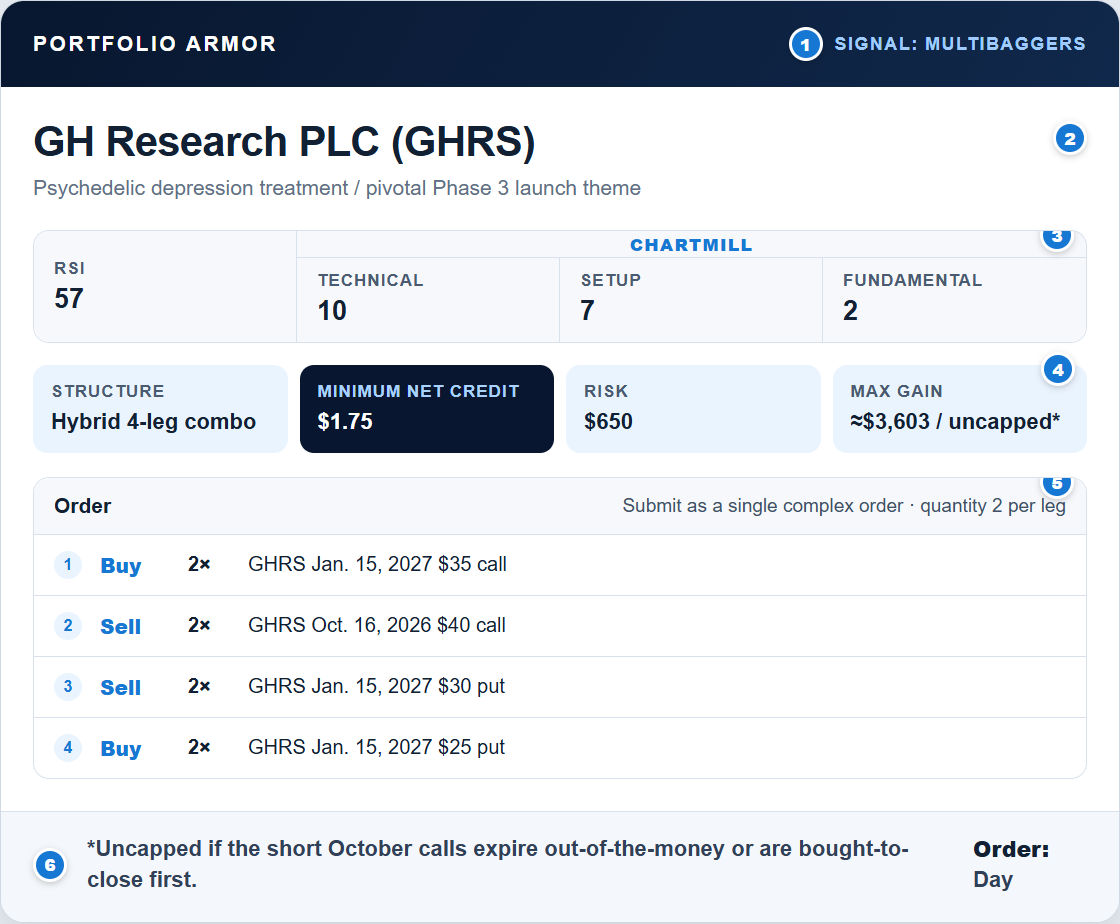
Idea source: A label such as Top Names, Market Watchers, or Multibaggers tells you where the idea came from. It isn’t a strength rating.
Security and theme: The company, ticker, and concise investment theme identify what the trade is about.
Technical and Fundamental checks: The rounded RSI and verified Chartmill Technical, Setup, and Fundamental ratings show how the name scored in our technical and fundamental review.
Structure, price, and risk: This section names the structure, gives the maximum net debit we’ll pay or minimum net credit we’ll accept, and translates that limit into the maximum dollar risk for one complete order. It also shows the maximum gain when it’s defined; some structures can remain uncapped if a short call is resolved first.
Complete order: Every action, quantity, expiration, strike, and option type appears in the order section. Enter all of the legs together as a single complex order.
Execution details: The footer states the order duration and any important qualification that doesn’t fit in the metrics row. Unless an alert says otherwise, entry orders are day orders.
Immediately below the card, you’ll see This trade hasn’t filled yet. That status remains until the order fills. When it fills, we strike through the status line and add the actual fill price. Until then, the alert describes a working order, not a position.
The analysis after the card adds the context that doesn’t belong inside an order ticket: the business or catalyst, the reason for the expiration, the trade’s payoff, and why we chose that structure.
One Order, All the Legs
All of our multileg structures should be entered as a single complex order. In options-market terminology, that means two or more legs submitted together at one net price and in a defined ratio.
You aren’t independently submitting one leg and then trying to fill the others. Your broker’s multileg ticket assembles the entire structure, and any execution preserves the stated ratio.
If you don’t see a way to enter a multileg trade on your brokerage screen, contact your broker. You may need to apply for approval to trade multileg options before the complex-order ticket becomes available.
Read the Net Price and Risk
A maximum net debit is the most we’re willing to pay for the complete structure. A minimum net credit is the least we’re willing to receive. These are the limits on our orders, not individualized instructions to subscribers.
Option prices are quoted per share, while a standard equity-option contract normally represents 100 shares. A $0.40 net debit for one complete combo therefore means $40, before commissions and fees. The card translates that order price into a dollar maximum risk when the structure has defined risk.
That risk figure is based on the published limit price. If we fill at a better price, the actual risk may be lower.
Recognize the Common Structures
The card names the structure, but the order legs control. These are the structures you’ll see most often:
3-leg combo: a long call position partially financed by a bull put spread.
Standard 4-leg combo: a bull call spread financed by a bull put spread.
Hybrid 4-leg combo: a diagonal calendar spread financed by a bull put spread.
We occasionally use bearish versions of these structures, in which a long put position or a bear put spread is financed by a bear call spread.
Basic Option Terms
Call and Put Options
A call gives its buyer the right to buy the underlying security at the strike price. A put gives its buyer the right to sell the underlying security at the strike price. Buying an option creates a right; selling one creates an obligation if the option is assigned.
Long Call
A long call is a call you buy for upside exposure. Its risk is limited to the premium paid.
Long Put
A long put is a put you buy for downside exposure. Its risk is limited to the premium paid.
Bull Put Spread
A bull put spread combines a short put with a lower-strike long put. The long put limits the risk of the short put, while the spread helps finance the trade’s bullish exposure.
Bull Call Spread
A bull call spread combines a long call with a higher-strike short call. Selling the higher-strike call reduces the cost of the long call while capping the spread’s upside.
Diagonal Calendar Spread
A diagonal calendar spread combines options with different expiration dates and strike prices. In our bullish hybrids, we typically buy a longer-dated call and sell a nearer-dated, higher-strike call against it.
Bear Put Spread
A bear put spread combines a long put with a lower-strike short put. Selling the lower-strike put reduces the cost of the long put while limiting the spread’s payoff below that strike.
Bear Call Spread
A bear call spread combines a short call with a higher-strike long call. The long call limits the risk of the short call.
The paragraph below the card explains what the structure is meant to accomplish. A profitable, established company may support a conservative 4-leg combo entered for a credit. A more speculative idea may call for defined-cost upside exposure or a put spread that finances part of a long call.
Why We Price the Whole Package
The midpoint shown by a broker can be misleading when one leg has a stale quote or a very wide bid-ask spread. We therefore price each leg and the complete package ourselves before setting a limit.
Our three usual checks are Black-Scholes, Bjerksund-Stensland, and a Cox-Ross-Rubinstein binomial model. We also compare those estimates with the live market. The resulting fair-value range, our published limit, and the eventual fill are three different things.
You can try to get a better price first—a lower net debit or a higher net credit—and then walk your bid or ask toward the limit price. We stop bidding at the published limit, even if the trade doesn’t fill.
Follow the Fill and Exit Plan
Unless an alert says otherwise, an entry order is a day order. If it doesn’t fill, it expires at the end of the session. Any reprice or renewed order will appear as an update when it’s genuinely new information.
The Exiting These Trades section lays out the intended management plan. Depending on the structure, that may include:
a good-’til-canceled order on a standalone long option;
an order to exit a spread at one net price;
buying to close a short call before setting a target on the remaining long call; or
holding a structure through a named catalyst or expiration review.
If the short call in a hybrid position is still open, we generally wait to resolve it before setting a runner target on the long call.
Know Where Updates Appear
After a fill, we edit the original alert with the execution price. Material management changes may also appear in the comments and, when timely delivery matters, in a Substack chat thread that is also sent by email.
Our weekly Runner Review revisits eligible uncapped options. Material catalysts, approaching expiration, or changes in the remaining legs can prompt an earlier update.
The weekly Exits post records partial and full exits and links them back to their original alerts and exit comments.
Our Performance Record
Our weekly Exits posts show the economics of each completed or partially completed trade. For both winners and losers, the headline figure is the return on maximum risk. The return on premium outlay or premium collected appears in parentheses when it adds useful context.
The performance tracker uses one consistent denominator: return on maximum risk. It shows the win rate, average winning return, average losing return, and number of completed trades
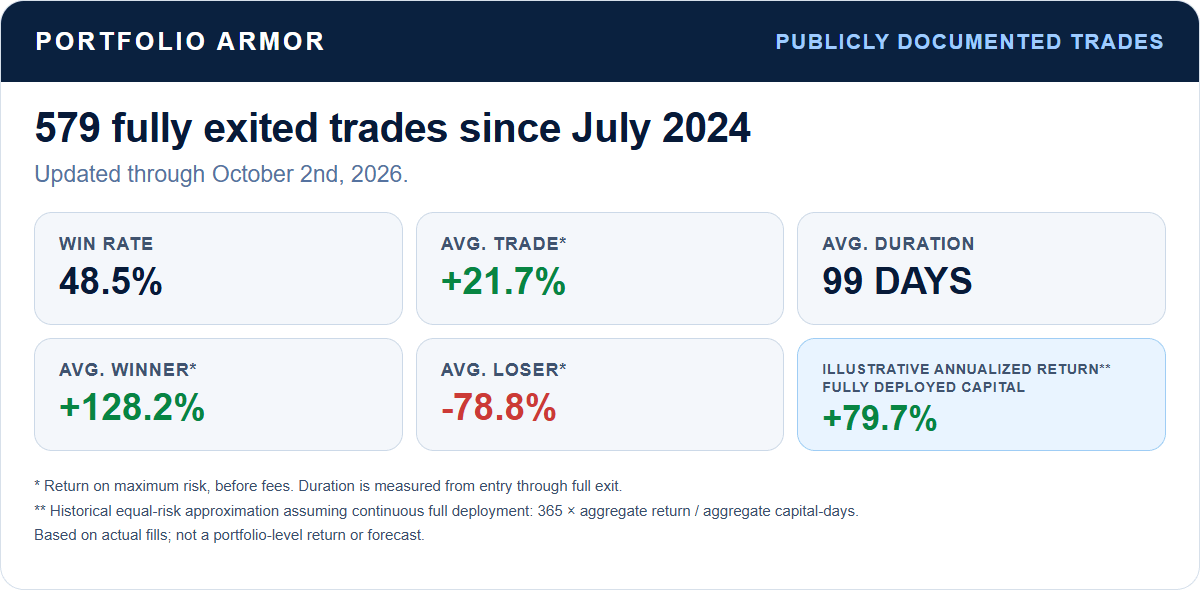
The underlying calculations remain available in our public trade ledger.
Before You Enter Your First Alert
Check that your brokerage account can submit the displayed structure as one complex order. Then verify the ticker, action, quantity, expiration, strike, option type, and net limit against the card before previewing the order.
Decide for yourself whether the card’s maximum risk fits the amount you’re willing to lose. Then follow the Exiting These Trades section and later updates for the management plan.
The short version is simple: the card tells you what we’re trying to enter, the analysis tells you why, the status line tells you whether it filled, and the exit section tells you how we plan to manage it.